Hi there, and welcome. I’m an angler based in Wakayama, Japan, and I share what I learn on the water.
In this article, I’ll show you how to tie the Fire Knot — a simple, fast line-to-leader connection.
The Fire Knot works well for a wide range of lure fishing: eging (squid fishing), seabass fishing, red snapper fishing, mackerel fishing, and more.
- Pros and cons of the Fire Knot
- How to tie the Fire Knot
- Step 1: Make a loop with the leader line
- Step 2: Pass the PE line through the loop
- Step 3: Wrap the PE line from the lower side
- Step 4: Repeat the wraps around the doubled leader
- Step 5: Wind the PE line back toward the loop
- Step 6: Put the PE line back through the loop
- Step 7: Wet the line and tighten the knot
- Summary: How to tie the Fire Knot
Pros and cons of the Fire Knot
Advantages
The biggest advantage is that it’s easy and quick to tie — even out on the rocks with cold hands. The finished knot is also relatively small, so it passes through the rod guides smoothly.
Disadvantages
The Fire Knot isn’t well suited to thick line. As the line gets heavier, the knot loses reliability.
That’s why the Fire Knot is a great match for lighter setups like eging and seabass fishing, rather than heavy offshore rigs.
How to tie the Fire Knot
I made a video showing exactly how to tie the Fire Knot. If you’d rather watch than read, check it out below.
If the video helps you or you enjoy it, please consider subscribing to my YouTube channel.
The video has Japanese captions, so if you’d prefer a step-by-step explanation in English, I’ve written it out below with photos.
To make each step easy to follow, I’ve tied the knot using two pieces of woolen yarn instead of fishing line. The green yarn is the leader line, and the pink yarn is the PE (braid) line.

Step 1: Make a loop with the leader line
First, form a loop in the leader line.


Pinch the base of the loop and hold it in place.
Step 2: Pass the PE line through the loop
Pass the PE line up through the loop from below — from the lower side to the upper side.

Step 3: Wrap the PE line from the lower side
Wrap the PE line around the doubled leader line, starting from the lower side.

Step 4: Repeat the wraps around the doubled leader
Keep wrapping around the doubled leader line.


Make about 7 wraps.
Important: as you wrap the PE line, work from the loop side (the loop end of the leader) toward the other side (your right hand).


Step 5: Wind the PE line back toward the loop
Now wrap the PE line back from your right-hand side toward the loop of the leader.
On the way back, make the same number of wraps as before, crossing over the first set of wraps.


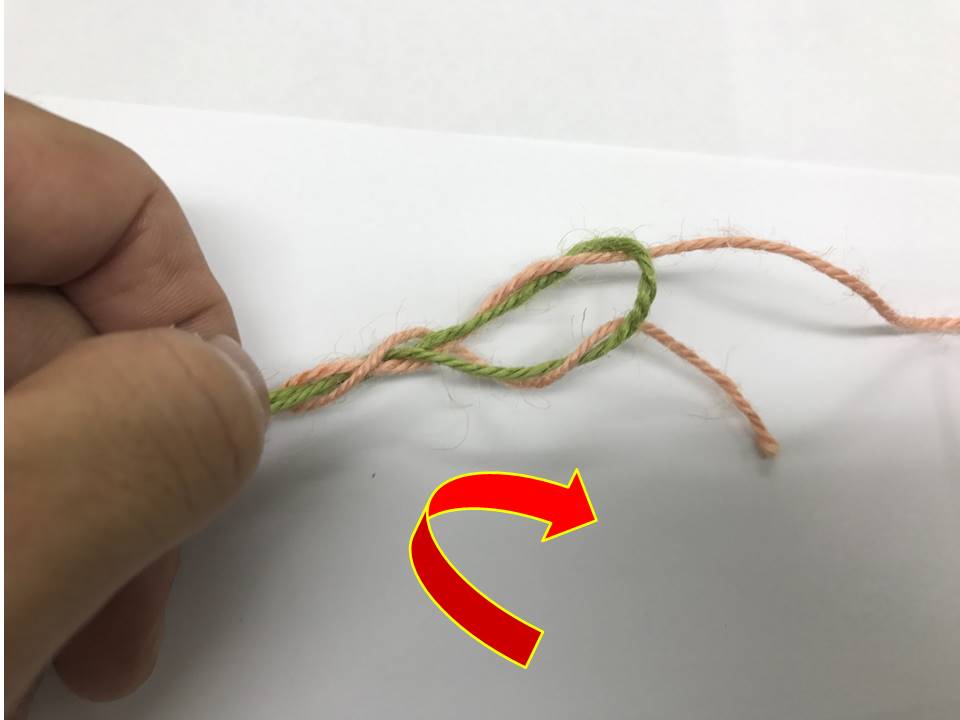
Step 6: Put the PE line back through the loop
Once you’ve wrapped back to the loop, pass the PE line through the loop from the upper side.
It should look like the photo below.

Step 7: Wet the line and tighten the knot
Gently pull on both the doubled PE line and the doubled leader line.
Wet the PE line (a little moisture helps the knot seat without friction damage).
Then pull the doubled PE line and the doubled leader line firmly to tighten the knot.

Trim the leftover tag ends.
Done!
Summary: How to tie the Fire Knot
The Fire Knot is a great choice for eging (squid fishing), seabass fishing, and similar light lure setups.
It’s easy, it’s fast, and the small knot runs smoothly through your guides.
Here are my other knot articles:
Palomar knot + knitting + ending knot for shore casting → read here
Shoddy knot for shore casting → read here
Perfect knot for squid fishing → read here
Thanks for reading all the way to the end.
I’m still working on my English, and I’m translating my Japanese articles into English little by little. If anything reads awkwardly, I appreciate your patience — and you can always view the original pages in Japanese.
Tight lines!