Have you ever wondered which knot is best for joining your PE braid to a leader when eging?
My personal go-to is a fast, simple friction knot that anglers in Japan call the Fire Knot — quick to tie, strong enough, and with a nice small profile.
- The Fire Knot: an easy, fast friction knot for eging
- How to tie the Fire Knot (video)
- How to tie the Fire Knot, step by step with photos
- Step 1: Make a loop with the leader
- Step 2: Pass the PE through the loop
- Step 3: Bring the PE under the leader to the other side
- Step 4: Take the PE back over, wrapping once around the leader
- Step 5: Keep wrapping the PE around the leader in a spiral
- Step 6: Wrap back toward the loop the same number of times
- Step 7: Pass the PE tag up through the loop, symmetrical to the start
- Step 8: Snug it lightly, wet it, then cinch down slowly and tight
- Fire Knot for eging: summary
The Fire Knot: an easy, fast friction knot for eging
For eging, I personally recommend a knot that is quick and simple to tie, yet still gives reasonable strength — the Fire Knot.
It’s worth being clear about what this knot is. The Fire Knot is a friction knot, in the same family as the FG knot — but it is not the FG knot. I used to tie my leaders with the FG knot, the same as I do for shore jigging, but for eging I found it a little wasteful in both time and strength, so I switched to something more effortless. If you’ve tied an FG knot before, you’ll pick this up quickly.
Advantages and disadvantages of the Fire Knot
In simple terms, the Fire Knot works by wrapping the PE braid around a loop of leader, and it holds through nothing but tension and friction. Some anglers say it can slip out if you get the number of wraps or the balance wrong — but in my experience, once you’re used to it, it almost never slips, and it has more than enough strength for seabass, flatfish, or even tairaba (rubber jigs).
Why the Fire Knot suits eging
The strength of the Fire Knot is that it’s simple and fast to tie. For how easy it is, the connection is reasonably strong, and it’s especially suited to joining thinner lines together.
I find it forgiving and hard to get wrong, so I can tie it comfortably even on a rocking boat. Above all, it’s effortless and the finished knot is small.
The downsides of the Fire Knot
Its weak points are that it doesn’t suit thick line, and you can’t really fine-tune it to be stronger or to sit smaller. Given those strengths and weaknesses, I think it’s a perfect match for eging: if your leader gets chafed on rocks or structure, you can cut it and re-tie in seconds, and it still holds up plenty well for red monsters (big autumn/winter squid) and spring squid.
It handles everything from the thin leaders of autumn eging up to seabass-class leaders. I haven’t tested it with shore-jigging line, but for leaders up to around 20 lb (PE #5) it works fine. I use this connection across a wide range of fishing — eging, tairaba, seabass, wind (weighted worm for hairtail), flathead, rockfish, chinu (black seabream), and small trevally. When I’m chasing hard-pulling pelagics, I feel the strength isn’t quite enough and switch back to the FG knot.
When you tie it, have a PE cutter or a lighter ready to trim and burn the tag ends.
How to tie the Fire Knot (video)
Here’s a video that walks through how to tie it, so take a look first.
How to tie the Fire Knot, step by step with photos
For those who find the video hard to follow, let me explain with photos.
I’ll use two pieces of wool yarn to make it easy to see.
Think of the green yarn as the leader and the pink yarn as the PE line.

Step 1: Make a loop with the leader
First, make a loop with the leader.
Once you’re used to it you can tie it even with a small loop, but at first a slightly larger loop is easier to work with — roughly 4 to 5 cm across.
Once the loop is formed, pinch the leader together with your left hand so the loop doesn’t collapse (right hand if you’re left-handed).


The loop stays like this for a while, so keep those fingers pinched and don’t let go.
Step 2: Pass the PE through the loop
Pass the PE up through the leader loop from below, and out the top.
From below… to the top. Then pull it out in the direction shown in the photo below.

(You could go top-to-bottom instead, but then every following step reverses, which makes it harder to follow along.)
Step 3: Bring the PE under the leader to the other side
This is oddly hard to put into words, but: take the PE you brought out in Step 2, pass it under both strands of the leader, and bring it around to the opposite side.
Hard to picture, right? The photo below makes it much clearer.

Step 4: Take the PE back over, wrapping once around the leader
Again, tricky to describe in words: take the PE you brought toward you in Step 3 and carry it back up and over, straddling both leader strands, so it completes one wrap around the leader.

Step 5: Keep wrapping the PE around the leader in a spiral
Wrap the PE around the two leader strands once more in the same way. Then again… about 7 wraps is a good, easy-to-tie number.
Important point here: when you wrap the PE, always progress from the loop toward your hand.
In other words, start the wraps on the loop side, and make each new wrap a little closer to your hand.
If you don’t, the knot won’t seat at the end — it’ll come undone or fail to cinch.

The idea is a spiral moving toward your hand, about 7 wraps.
There’s no fixed rule for the count — anywhere from about 5 to 8 wraps, wherever it ties easily, is fine.

Step 6: Wrap back toward the loop the same number of times
Now wrap back the other way — in the same rotational direction — heading back toward the loop, wrapping the PE around both leader strands again.
There’s no special trick, but if you make the same number of wraps as you did on the way out, crossing over them neatly, the knot seats smoothly.

Done neatly, it looks like this.

(In this photo I’ve only wrapped about 3 times.)
Step 7: Pass the PE tag up through the loop, symmetrical to the start
Pass the tag end of the PE you’ve been wrapping up through the loop from below.
If you’ve followed the steps above, be sure to pass it through from below (so the line exits in the same direction as when you first threaded the loop).
Because at the end you’ll pull on both PE strands and both leader strands, it’s ideal to end up symmetrical to the PE you first passed through the loop.
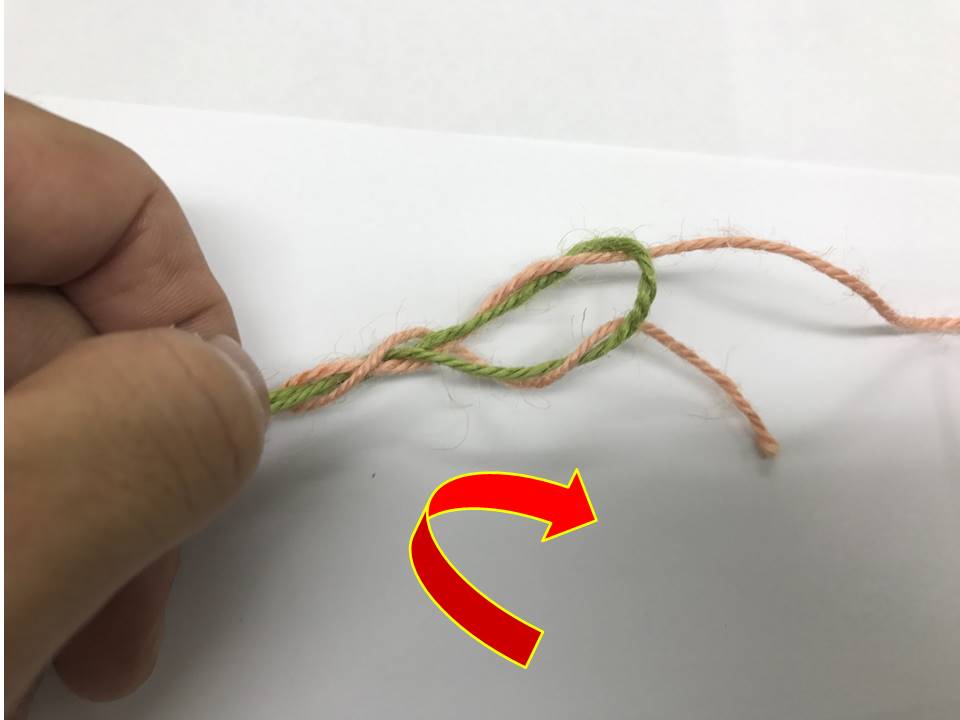
I’m not sure how best to word it, but: aim for a shape that looks like it will cinch when you pull the two PE (pink) strands.
When I first started I did this a few times — if you push the tag through the loop from the wrong side and try to cinch, it just twists up like a paper spill, so be careful.
Passed through correctly, it looks like this.

Step 8: Snug it lightly, wet it, then cinch down slowly and tight
Once you’re at Step 7, you’re almost there.
Hold both PE strands and both leader strands and pull gently.
The wrapped section shrinks a little as it draws together, so snug it up without fully cinching yet.
Once you’ve snugged the wraps, wet the wrapped section.
(I’m lazy, so I hold it in my mouth and wet it with saliva — but I sometimes get told that’s gross, so wetting it with seawater is perfectly fine.)
Once wet, pull the two PE strands and two leader strands to draw it together gradually, and when it stops moving, pull the long leader end and the long PE end to cinch it down tight, little by little.

And it’s done. Even tied in wool yarn it comes out this compact, so with PE and fluorocarbon it’ll be even smaller.
All that’s left is to trim the excess.
The Fire Knot isn’t the kind of knot that fails by slipping off the end — the load sits so that it would break at the tag rather than pull through — so I’d avoid adding an ending/finishing knot on top.
Adding one would ruin the small, snag-free profile you just made, so trim the tag ends leaving only a tiny amount.
And that’s it — finished!
Tie your PE to leader with the Fire Knot and the knot stays small, so it won’t catch in the guides or create extra water resistance.
On top of that, it’s quick and easy — you can tie it fast even while standing on the rocks — which makes it ideal for eging.
Fire Knot for eging: summary
The Fire Knot is a great choice for the many kinds of fishing that use thin PE line — eging, seabass, tairaba, flathead and more.
Simple as it is, fumbling a knot on the water is a cold-sweat moment, so it’s worth practising at home before you head out.
These days, whenever I join PE to fluorocarbon for anything other than shore jigging or shore casting, I reach for the Fire Knot almost every time. Easy, relaxed, and fast. If you’re worried about its strength, tie one and give it a good pull — cinched down properly, it’s surprisingly strong.
More line-to-leader knots
Getting the rest of your setup dialled in? Here’s the gear I actually carry for eging: Eging Gear Guide
New to eging? Start with the essentials: Eging for Beginners: The 4 Essentials